Showing posts with label Win7. Show all posts
Showing posts with label Win7. Show all posts
Tuesday, December 18, 2012
TIPS & TRICKS: Download Dell OS Media
So the other day, I was helping someone reload their Dell machine. The media to reinstall Windows was not available. I contacted Dell to see if they could send another set. They agreed, but I needed to get this machine back up and running sooner. At some point, I thought to myself how great it would be if I could just download the media and create my own bootable media set. Eventually, I found the original set that came with the computer and got it reloaded.
However, I came across this site that does allow downloading of software to create bootable media. Fortunately, it's a Dell site, which redirects to Digital River, also a trustworthy site.
http://en.community.dell.com/support-forums/software-os/w/microsoft_os/1439.02-microsoft-windows-and-microsoft-office-downloads.aspx
Hope this helps. Happy Computing.

Sunday, November 13, 2011
TIPS & TRICKS: "Randomly" Waking Windows 7 Computer
Awhile back, I noticed my workstation was waking up in the middle of the night. After checking the system logs, I found that there was a Google update service that woke the computer up. I fixed that one. To my surprise, I found my computer on again at 1:41am. Another piece of update software woke up the machine. This useful command helped to confirm my findings in the log:
powercfg -lastwake
Just need to make sure to run it from a command prompt as and administrator:
- Click Start
- Type cmd in the Search programs and files box
- right click cmd under Programs and select "Run as Administrator"
If this line is included in the results after the powercfg -lastwake command is issued:
Windows will execute 'MicrosoftWindowsMedia Centermcupdate_scheduled' scheduled task that requested waking the computer.
Then, here's the fix:
- Go to Start > All Programs > Accessories > System Tools > Task Scheduler
- Expand Task Scheduler Library > Microsoft > Windows > Media Center
- Find mcupdate_scheduled (note: make sure to find this one because there's another one called just mcupdate)
- Right click on mcupdate_scheduled and select "Properties".
- Select the Conditions tab
- Uncheck "wake the computer to run this task"
powercfg -lastwake
Just need to make sure to run it from a command prompt as and administrator:
- Click Start
- Type cmd in the Search programs and files box
- right click cmd under Programs and select "Run as Administrator"
If this line is included in the results after the powercfg -lastwake command is issued:
Windows will execute 'MicrosoftWindowsMedia Centermcupdate_scheduled' scheduled task that requested waking the computer.
Then, here's the fix:
- Go to Start > All Programs > Accessories > System Tools > Task Scheduler
- Expand Task Scheduler Library > Microsoft > Windows > Media Center
- Find mcupdate_scheduled (note: make sure to find this one because there's another one called just mcupdate)
- Right click on mcupdate_scheduled and select "Properties".
- Select the Conditions tab
- Uncheck "wake the computer to run this task"
- Hit OK to exit.
Just did this to my workstation and will see if it works. Credit goes to this site:
http://www.beirtech.com/blogs.php?action=view&bid=6
Just did this to my workstation and will see if it works. Credit goes to this site:
http://www.beirtech.com/blogs.php?action=view&bid=6
Thursday, March 10, 2011
TIPS & TRICKS: Denying Access to Browsers for Specific Users
Had an interesting request about denying internet access to a particular user account on a Windows machine. This exercise showed me again that is usually more than one way to accomplish something. The first hurdle was that this needed to be done on different versions of Windows. It was already done on a Windows XP machine via NTFS permissions. I had to find a way to do it on Windows Vista Home Premium and Windows 7 Enterprise.
On Windows Vista Home Premium (HP), the process was actually fairly easy. Windows Vista HP has Parental Controls in it, which helped us accomplish our goal. Specifically, it was the Vista Web Filtering tools built-in to the Parental Controls. First, turn on the Parental Controls found in Control Panel. Next click through to the Web Filtering tool and enable the sites allowed option. The key to make this work is to make sure to NOT list any sites to be allowed. This will block all connections via a web browser. What's more, I tested this through Firefox in the account controlled by Parental Controls as well and it worked too.
Windows 7 did away with the Web Filter tools in Parental Controls. Had to find another way to do it. A Google search yielded the path of using a proxy address to control the flow. The nice thing about this solution is that proxy configurations are now user-specific, which means it only affects the one user and not all users. Here are the steps:
1. While in the user account that needs to be limited, setup a proxy server address in Internet Options > Connections > LAN settings. I used 127.0.0.1.
2. Log out and login to an account with administrative access.
3. Launch Local Group Policy Editor (gpedit.msc).
4. Under User Configuration > Administrative Templates > Windows Components > Internet Explorer > Browser Menus, enable the Tools menu: Disable Internet Options... menu option. This will disable access to Internet Options from Internet Explorer.
5. In the same window for Local Group Policy Editor, go to User Configuration > Administrative Templates and click on Control Panel.
6. Open the option for Hide specified Control Panel items and enable it. Then click on the Show button.
7. In a blank field under the Value column, type in Microsoft.InternetOptions. This disables access to the Internet Options area from the Windows Control Panel.
8. Hit OK, OK, and close out the Local Group Policy Editor.
A few pertinent notes here: we were only concerned with blocking browser access. There are, of course, other ways to get connected, but that's a task for another day. Also, these machines were not joined to any domain, only setup as stand-alone machines. Finally, the locking out of Internet Options at the Internet Explorer level and the Control Panel level is effective for all users, unlike the proxy setting that only affects the one user. Also, always make sure to test before deploying.
Update (2012_02_02): Before locking out Internet Options, check this setting. In Internet Options > Connections > LAN Settings, make sure to uncheck Automatically detect settings. This ensures that the proxy settings are used every time (Thanks to my colleague, Erin for pointing this out.)
Happy Computing.
On Windows Vista Home Premium (HP), the process was actually fairly easy. Windows Vista HP has Parental Controls in it, which helped us accomplish our goal. Specifically, it was the Vista Web Filtering tools built-in to the Parental Controls. First, turn on the Parental Controls found in Control Panel. Next click through to the Web Filtering tool and enable the sites allowed option. The key to make this work is to make sure to NOT list any sites to be allowed. This will block all connections via a web browser. What's more, I tested this through Firefox in the account controlled by Parental Controls as well and it worked too.
Windows 7 did away with the Web Filter tools in Parental Controls. Had to find another way to do it. A Google search yielded the path of using a proxy address to control the flow. The nice thing about this solution is that proxy configurations are now user-specific, which means it only affects the one user and not all users. Here are the steps:
1. While in the user account that needs to be limited, setup a proxy server address in Internet Options > Connections > LAN settings. I used 127.0.0.1.
2. Log out and login to an account with administrative access.
3. Launch Local Group Policy Editor (gpedit.msc).
4. Under User Configuration > Administrative Templates > Windows Components > Internet Explorer > Browser Menus, enable the Tools menu: Disable Internet Options... menu option. This will disable access to Internet Options from Internet Explorer.
5. In the same window for Local Group Policy Editor, go to User Configuration > Administrative Templates and click on Control Panel.
6. Open the option for Hide specified Control Panel items and enable it. Then click on the Show button.
7. In a blank field under the Value column, type in Microsoft.InternetOptions. This disables access to the Internet Options area from the Windows Control Panel.
8. Hit OK, OK, and close out the Local Group Policy Editor.
A few pertinent notes here: we were only concerned with blocking browser access. There are, of course, other ways to get connected, but that's a task for another day. Also, these machines were not joined to any domain, only setup as stand-alone machines. Finally, the locking out of Internet Options at the Internet Explorer level and the Control Panel level is effective for all users, unlike the proxy setting that only affects the one user. Also, always make sure to test before deploying.
Update (2012_02_02): Before locking out Internet Options, check this setting. In Internet Options > Connections > LAN Settings, make sure to uncheck Automatically detect settings. This ensures that the proxy settings are used every time (Thanks to my colleague, Erin for pointing this out.)
Happy Computing.
Thursday, February 24, 2011
TIPS & TRICKS: Installing Language Packs in Windows 7
Okay there's plenty of postings on instructions for installing language packs in Windows 7. Here's a couple of Microsoft's instructions:
http://support.microsoft.com/kb/972813
http://windows.microsoft.com/en-us/windows7/products/features/language-packs
All these instructions indicate the best way to obtain the language packs are through Microsoft Update that is built-in to Windows 7. These instructions are great, except for one missing step. When you get to the Microsoft Update window on a new machine, there isn't a link for Optional Updates, where the language packs reside.
To get there, you'll need to first click on the link that says "Check online for updates from Microsoft Update". After the machine checks for updates, it will show the link for the Optional Updates.
Hope this helps you save some time. Happy Computing.
http://support.microsoft.com/kb/972813
http://windows.microsoft.com/en-us/windows7/products/features/language-packs
All these instructions indicate the best way to obtain the language packs are through Microsoft Update that is built-in to Windows 7. These instructions are great, except for one missing step. When you get to the Microsoft Update window on a new machine, there isn't a link for Optional Updates, where the language packs reside.
To get there, you'll need to first click on the link that says "Check online for updates from Microsoft Update". After the machine checks for updates, it will show the link for the Optional Updates.
Hope this helps you save some time. Happy Computing.
Tuesday, May 25, 2010
RANTS & RAVES: Latest MacBook Pro (with i7 Core Processor) and Snow Leopard
First, Apple has made yet another decision to make life harder for Sysadmins. In reloading a brand new MacBook Pro with i7 Core processor, I discovered that my Snow Leopard (OS X 10.6) images would not work. I further realized that none of my Snow Leopard media (DVDs) worked either. In fact, as of this moment, no retail copy of Snow Leopard sitting on store shelves will work with these newly released MacBook Pros. The only bootable Snow Leopard disk that works right now is the one that came with the machine. As such, I had to build a new image using this media.
Second, I attempted to save some time by partitioning the HD before reloading the OS. I planned to use Bootcamp to install Windows 7 64-bit onto the MacBook Pro. I also found that this step doesn't work. When launching Bootcamp from the application located in Utilities, Bootcamp does not recognize the partition I setup for the Windows partition prior to loading OS X. Luckily, I had already imaged the OS X load and could easily wipe the drive again and just reimage. The raves of this post is, of course, the ability to image without having to start all over. How frustrating would it be have to start over? I don't want to find out.
Hope this helps you save some time.
Happy Computing.
Second, I attempted to save some time by partitioning the HD before reloading the OS. I planned to use Bootcamp to install Windows 7 64-bit onto the MacBook Pro. I also found that this step doesn't work. When launching Bootcamp from the application located in Utilities, Bootcamp does not recognize the partition I setup for the Windows partition prior to loading OS X. Luckily, I had already imaged the OS X load and could easily wipe the drive again and just reimage. The raves of this post is, of course, the ability to image without having to start all over. How frustrating would it be have to start over? I don't want to find out.
Hope this helps you save some time.
Happy Computing.
Thursday, May 06, 2010
TIPS & TRICKS: Software Licensing Manager
Learned to how to obtain more detailed information about Windows 7 activation. There's a tool built into Windows 7 called Software Licensing Manager. Running it in a Windows 7 command prompt with admin rights will yield information like:
- Activation ID
- Installation ID
- Partial Product Key
- License status
- Remaining Windows rearm count
This last piece of information is important to Windows 7 imaging. I've found that if this rearm count gets to zero (start with 3 on a fresh install), then Windows will no longer boot properly.
The command to use at the command prompt to retrieve this information is slmgr /dlv. There are other parameters that can be applied, but /dlv is the most detailed. After running the command, a Windows Script Host window will be displayed with the information.
Hope this helps you. Happy Computing.
- Activation ID
- Installation ID
- Partial Product Key
- License status
- Remaining Windows rearm count
This last piece of information is important to Windows 7 imaging. I've found that if this rearm count gets to zero (start with 3 on a fresh install), then Windows will no longer boot properly.
The command to use at the command prompt to retrieve this information is slmgr /dlv. There are other parameters that can be applied, but /dlv is the most detailed. After running the command, a Windows Script Host window will be displayed with the information.
Hope this helps you. Happy Computing.
Tuesday, April 20, 2010
TIPS & TRICKS: Login to Windows 7 Without Knowing Machine Name
When Windows 7 is joined to a domain, the default login prompt automatically allows a domain user to login to the machine with just username/password. However, a local account user would need to know the name of the machine to login to the machine (i.e. machinename\user).
At least that's what I thought, until now. I don't always remember the name of the computer that I'm working on. The workaround the login prompt and not knowing the machine name is to substitute a period for the computer name. For example, if my machine name is PC-1 and my username is bobama, then for the username field, I would enter:
.\bobama (instead of PC-1\bobama)
Hope this helps someone. Happy computing.
At least that's what I thought, until now. I don't always remember the name of the computer that I'm working on. The workaround the login prompt and not knowing the machine name is to substitute a period for the computer name. For example, if my machine name is PC-1 and my username is bobama, then for the username field, I would enter:
.\bobama (instead of PC-1\bobama)
Hope this helps someone. Happy computing.
Monday, March 01, 2010
TIPS & TRICKS: Vista and Multiple Simultaneous Network Connections
I've been observing Windows connection problems via wireless for quite some time now. I'm hoping this might be a fix for many of those problems. Basically, there are multiple connections to the same wireless network. This could, potentially, cause some confusion by the OS.
Vista has a wireless profile manager. However, there is yet another place where wireless connections are stored. This is the network location manager. This stores the previously used wireless networks even if a profile was not created. You should be able to find this under Network and Sharing Center > Customize > Manage or delete network locations. This will allow for the deletion (or merging) of duplicate network locations.
Note: I have not yet had a chance to test this with Windows 7. However, I suspect the behavior is similar.
Here's where I originally found this solution and the complete steps:
http://www.annoyances.org/exec/show/article04-500
Happy Computing.
UPDATE: Found it in Windows 7. In Network and Sharing Center, under View your active networks, click on the icon (not the text). The next window will be the Network Properties, where you'll find Merge or delete network locations. The follow the same steps as previously noted.
Vista has a wireless profile manager. However, there is yet another place where wireless connections are stored. This is the network location manager. This stores the previously used wireless networks even if a profile was not created. You should be able to find this under Network and Sharing Center > Customize > Manage or delete network locations. This will allow for the deletion (or merging) of duplicate network locations.
Note: I have not yet had a chance to test this with Windows 7. However, I suspect the behavior is similar.
Here's where I originally found this solution and the complete steps:
http://www.annoyances.org/exec/show/article04-500
Happy Computing.
UPDATE: Found it in Windows 7. In Network and Sharing Center, under View your active networks, click on the icon (not the text). The next window will be the Network Properties, where you'll find Merge or delete network locations. The follow the same steps as previously noted.
Wednesday, February 03, 2010
RANTS: Connecting to a Windows 7 machine from RDP on OS X
The basics:
- OS X.4.11
- PowerPC G5 machine
- Remote Desktop Connection Client for Mac v2.0.1
- Connecting to a Windows 7 64-bit machine with latest RDP client
The symptoms:
- Connection can be made to Windows 7 machine
- Mouse functions work normally
- As soon as a key is pressed on the keyboard of the G5, the RDP client on the G5 quits.
- Problem does not seem to be the Windows 7 machine, as I can connect to it from an Intel-based Mac.
Guess:
- Problem likely has to do with that the G5 is a PowerPC processor. Any guesses?
- OS X.4.11
- PowerPC G5 machine
- Remote Desktop Connection Client for Mac v2.0.1
- Connecting to a Windows 7 64-bit machine with latest RDP client
The symptoms:
- Connection can be made to Windows 7 machine
- Mouse functions work normally
- As soon as a key is pressed on the keyboard of the G5, the RDP client on the G5 quits.
- Problem does not seem to be the Windows 7 machine, as I can connect to it from an Intel-based Mac.
Guess:
- Problem likely has to do with that the G5 is a PowerPC processor. Any guesses?
Tuesday, January 12, 2010
TIPS & TRICKS: Connecting to OS X Share from Windows 7
For some reason, I had not yet tried an AFP connection to an OS X server share from Windows 7 yet. So, I tried it today. Opened Computer, clicked on Map network drive and proceeded to map the drive. After providing the correct credentials, Windows 7 would not connect.
What do I do next? Search for an answer online (okay, I googled it). It took me a couple tries, but I finally found the following answer. Go to Administrative Tools > Local Security Policy > Local Policies - Security Options. Find the policy that's called:
Network security: LAN Manager authentication level
Then modify the setting to show Send LM & NTLM responses. Next, in the same location, find the policy that's called:
Network security: Minimum session security for NTLM SSP
Then modify the setting to disable Require 128-bit encryption. In my attempt, I only modified the first setting and was able to get in. The second setting was listed in the answer I found here:
http://www.tomshardware.com/forum/75-63-windows-samba-issue
Basically, regardless of the type of connection (i.e. Samba, AFP, etc.) Windows needs to be able to send the correct type of challenge/response authentication protocol. By default, Windows 7 is not allowed to send the right one/type to OS X. This change in the local policies worked for me.
Happy Computing.
What do I do next? Search for an answer online (okay, I googled it). It took me a couple tries, but I finally found the following answer. Go to Administrative Tools > Local Security Policy > Local Policies - Security Options. Find the policy that's called:
Network security: LAN Manager authentication level
Then modify the setting to show Send LM & NTLM responses. Next, in the same location, find the policy that's called:
Network security: Minimum session security for NTLM SSP
Then modify the setting to disable Require 128-bit encryption. In my attempt, I only modified the first setting and was able to get in. The second setting was listed in the answer I found here:
http://www.tomshardware.com/forum/75-63-windows-samba-issue
Basically, regardless of the type of connection (i.e. Samba, AFP, etc.) Windows needs to be able to send the correct type of challenge/response authentication protocol. By default, Windows 7 is not allowed to send the right one/type to OS X. This change in the local policies worked for me.
Happy Computing.
TIPS & TRICKS: Installing Windows 7 on Dell Optiplex 755
Just ran through a clean installation of Windows 7 Enterprise 64-bit on a Dell Optiplex 755. Took a little more than 30 minutes. After the setup completed and I got to the Windows 7 desktop, I popped open Device Manager to see what drivers were missing. There were only 2 items needing drivers (PCI Serial Port & PCI Simple Communications Controller).
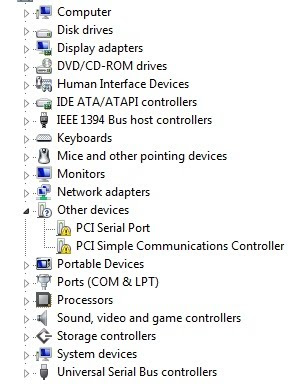
As I usually do, I went over to the Dell Support site to find the drivers. I put in the service tag of my machine and discovered that Dell, apparently, is not supporting Windows 7 running on an Optiplex 755. They had no drivers available for Windows 7, only XP and Vista. I thought for a moment and wondered if I should have backed up my previous Vista installation. Luckily, I found I was in better shape than I thought.
First, I realized that Windows 7 had drivers for the most crucial items in Device Manager (i.e. network connection, various controllers, audio/video, optical drives, etc.). Second, I searched and found others who had the same problem:
http://en.community.dell.com/forums/t/19299853.aspx
The 2 missing drivers were for components necessary for the Intel Management Engine, which can be disabled via the BIOS tool (CTRL-P). If the Intel Management Engine is disabled then the 2 components missing drivers will not appear in Device Manager.
Just in case, I decided to use the Vista drivers for the these two components, even though the Intel Management Engine will be disabled when I'm through with the setup. The installation worked fine.
Now, I'm off to check a whole bunch of other apps, including ADUC and Filemaker Pro, which had started to fail under Vista.
Happy Computing.

As I usually do, I went over to the Dell Support site to find the drivers. I put in the service tag of my machine and discovered that Dell, apparently, is not supporting Windows 7 running on an Optiplex 755. They had no drivers available for Windows 7, only XP and Vista. I thought for a moment and wondered if I should have backed up my previous Vista installation. Luckily, I found I was in better shape than I thought.
First, I realized that Windows 7 had drivers for the most crucial items in Device Manager (i.e. network connection, various controllers, audio/video, optical drives, etc.). Second, I searched and found others who had the same problem:
http://en.community.dell.com/forums/t/19299853.aspx
The 2 missing drivers were for components necessary for the Intel Management Engine, which can be disabled via the BIOS tool (CTRL-P). If the Intel Management Engine is disabled then the 2 components missing drivers will not appear in Device Manager.
Just in case, I decided to use the Vista drivers for the these two components, even though the Intel Management Engine will be disabled when I'm through with the setup. The installation worked fine.
Now, I'm off to check a whole bunch of other apps, including ADUC and Filemaker Pro, which had started to fail under Vista.
Happy Computing.
Subscribe to:
Posts (Atom)